
A month ago we redid all of our brand’s photos. They were due for a while now, but for some reason we kept pushing it forward.
Until two months ago, when we said enough is enough and went full photo-production mode 💪
To be honest, I was afraid it was going to feel like when my older cousin took my pre-bat-mitzvah photos…
He was the one in the family who had the good camera. And… he knew how to use it!
So I’m there thinking I’m a supermodel during the session but then I look at the pictures the week after that and all I could say is “meh” (yes, I do love those pictures now because who wouldn’t love that today, but I didn’t like them at all back then!).
Anyway, this photo shoot we just did was the exact opposite.
The photos turned out SO good I actually cried proud tears when we saw them. I’m not exaggerating even a little bit, you can ask everybody that was there.
But it did take quite a lot of work to make them be that good.
So I wanted to share with you our experience because you deserve nothing less than proud-crying over your own pictures too!
Few things will make such a positive impact on your visual communications as having great-looking photos. On your website, on your social media channels, for your profile picture, to send over to collaborators… Good pictures make all the difference.
So if you’ve decided to finally bring a professional photographer over and have that long-due personal photoshoot for your brand…
First, that’s AMAZING news!
But you’re probably wondering… Now what?
How can you make sure that the photos will come out great and be actually useful for all your communication needs?
What if you think you can’t take a good picture?
What exactly should you plan for prior to the session and for the day of the photoshoot?
Well, you can stop wondering now.
Here are ALL the things you need to keep in mind to have a successful photoshoot session 👇
#1 — Plan ahead
Most people think that setting a date and hiring a photographer is all you need to do for your photo shoot. But that’s just the beginning.
If you want to ensure that you’ll make the most out of it and that you’ll end up with the most amazing looking photos, there’s more to plan. And you don’t want to end up finding that out the day of the session.
So the first tip is: make a plan for your photoshoot.
What exactly you need to plan?
- You want to find the right location
- You want to think about what you’ll be wearing
- You want to think of the kind of pictures you’ll need, where you’ll be using them, in what context
- You want to find the appropriate photographer
- You want to know what the photographer may need that day depending on the location
We’ll talk about all these things next.
But for now, the key is that you know what you’re after.
Each personal brand is different and unique, so you want to start thinking about how you want your pictures to look like.
#2 — Research and put together a mood board
This is where I like to start planning.
I start every brand identity project by creating a new Pinterest board, so there was no chance I’d suggest otherwise for this.
Create a new Pinterest board and start looking for inspiration. Look at other personal brands, at your competition, look on sales pages, landing pages, on about pages, on Instagram posts… pin all the pictures you like into that board.
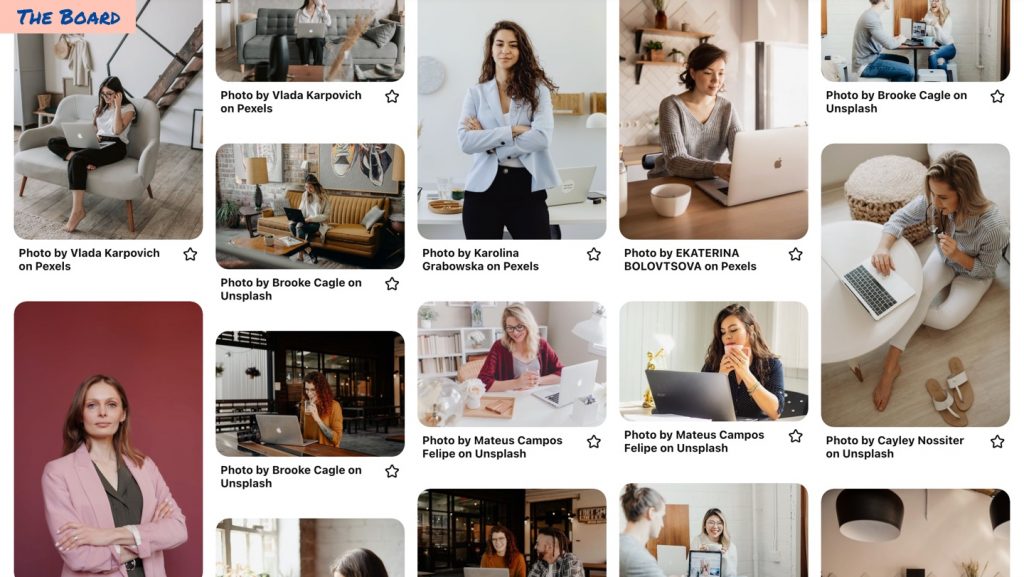
These will help you understand what works best for those photos:
- The kind of clothes they wear
- What’s in the background
- The gestures (are they smiling? do they look friendly, authoritative, happy?)
- The props they use
- The framing (is it full-body? from the waist up? portrait or landscape?)
You can even put together a mood board with the best photos you find.
This will be incredibly valuable later when you sit down with the photographer and tell them what you’re after to you make sure you’re both on the same page as to what are the actual photos you need to get out of there with.
But it’s also super useful to have some sort of a catalog full of picture ideas that you can replicate. Especially when you feel like you don’t have a clue how to pose 😅.
For example, I knew that I wanted to have a picture of me writing in my notebook, but I took that idea from another person that had a similar photo. Hadn’t I done my research, I wouldn’t probably have come up with that idea.
#3 — Find the right place
Ok, now that you’ve got a better idea of what you’re after with your photos, it’s time to start looking for the right location.
If you have a beautiful studio/office/home that suits your brand’s identity, then I’d say go for it. Personal brands go perfectly with showing your own space, where you work, and even where you live.
But it’s not a must. If you don’t feel that your own place reflects what you want to convey with the photos, then don’t force it, there are other options.
A good idea is to book a place for a day. It could be anything from cool Airbnb, a studio, an office, or a coworking space.
If you’re going with one of these options, make sure you clearly specify the host what you’re going to use the space for and explain that you’re gonna need to spend the whole day there. If it’s an Airbnb, don’t get surprised if they ask for a higher price than what a usual night costs, it’s a different kind of service after all.
Some important things to consider/ask about your location:
- Whether the space has natural light (even though your photographer will likely bring their own lights, they still need to know what they’ll be dealing with).
- Are there different nooks that you can take advantage of, like a desk, a sofa, the kitchen counter, a table, etc? The more the merrier.
- Whether it has something that won’t work at all even if you like the place. For example, they may have incredible old furniture and you’d rather like your photos to feel modern and minimalistic. Or maybe all the walls are pink, and pink doesn’t match your brand at all. Some things you’ll be able adjust or keep out of the frame, but others you won’t, so keep an eye on that.
- If you’re going to rent the space from a website, it’s a good idea to also ask whether the place still looks like in the pictures, or if something has changed, so you know what to expect (again, read the previous bullet point).
If it fits your brand’s identity, a whole different option is to do the photos outside. Maybe you want street pictures, or in the park, on a bridge, in nature, or in a special location that means something for your audience.
If that’s the case, go to that location first and take a few pictures even with your phone to see if it will actually works. That will also let you know what’s the best day/hour when there are fewer people around (fewer people around means that you’ll be more relaxed which is not a small thing when you have to keep your smile on for hours), or when does the light hit better, etc.
#4 — Find a great photographer
Tip number 4 is SUPER important and it can be summarized like this:
- Not every person with a professional camera is a professional photographer
- Not every professional photographer will have experience doing this kind of shots
You want your photographer to have experience with this type of photos, or at least with studio photography (that is, if you’re not going to take the pictures outside). In my opinion, photographers who specialize in social events like weddings and such may not be the best option for this kind of work, even if they are excellent in their field.
What to look for?
I’d try to find a branding photographer, someone who has worked with solopreneurs, small businesses, speakers, freelancers, coaches.
They have to know about proper lighting, of course, but that’s a given.
You want them to be someone who is super detail-oriented because you won’t be looking at the pictures they take while they take them, and so they need to know if something looks odd, even if it’s the smallest thing like a wrinkle in your clothes or how the elements in the background look.
Just to name an example, in our own session we were about to start shooting in one of the nooks and then the photographer stopped everything because he noticed that one of the books on the shelves wasn’t appropriate for that shoot 🙌.
And lastly, you want to feel comfortable with the photographer you choose. Especially if you’re not the kind who likes being photographed (ahem, ahem). So if a cousin is a great photographer and she offers you to take your pictures but you don’t really feel comfortable doing it with her, then I’d say try to find somebody else.
It’s super important that everybody has a nice time while taking the pictures!
This brings me to…
#5 — Talk to your photographer
As with every relationship, everything’s better when you have a good conversation. Even if the photographer you found is fantastic, they don’t live inside your head, and they may not know you personally or your business. So have an upfront conversation to set proper expectations for both sides.
Remember the Pinterest board we put together before? Here’s where it becomes highly useful.
Show the them the kind of photos you’re after. Also, show them pictures of the space where the session’s going to happen so they have a better understanding of what they’re going to need to light up the place.
That is also a good time to talk about technical details, especially the number of photos that you need and whether you’ll want them edited as well or not.
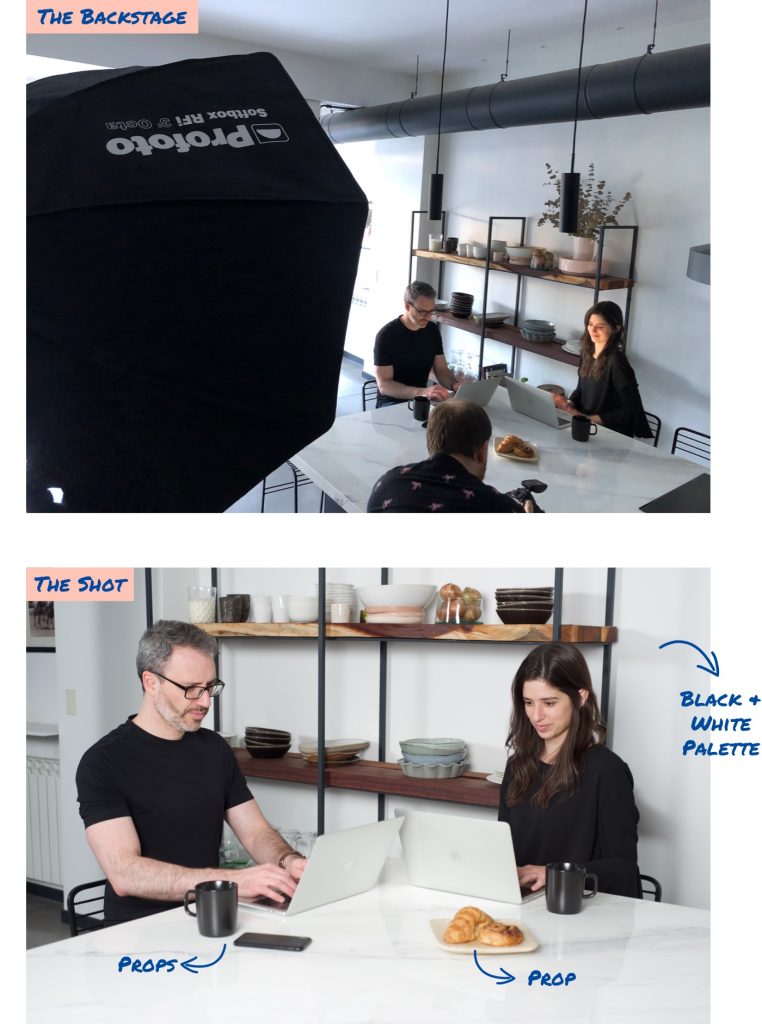
We told our photographer that we preferred quantity over having him spend time editing photos, and he was okay with that. So at the end of the session he handed us all the photos he had taken that day, and I took care of editing them afterward.
If you’d rather have the final photos edited by the photographer, then they’ll probably give you an estimate of how many photos you’ll get.
This is totally up to you, just talk to your photographer about these options and see what is best.
Lastly, be as specific as possible with your needs. You’re the one who knows where and how these photos are going to be used so don’t be shy and explain as much as possible. They’ll thank you for that!
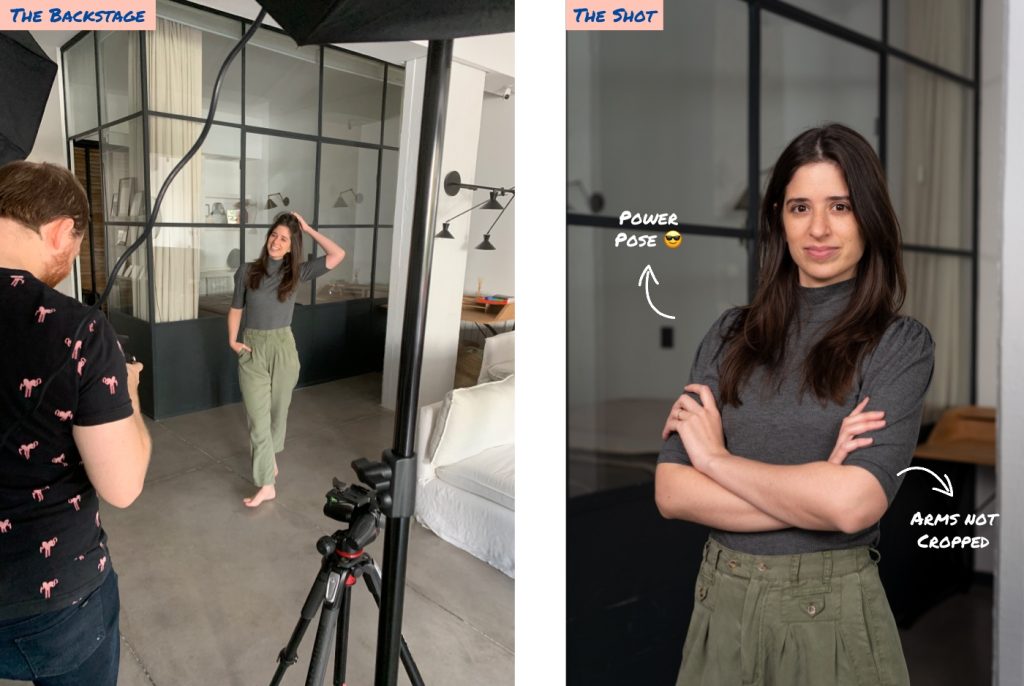
For example, we asked that he didn’t cut our arms/hands on any of the photos because we knew we would need to remove the background on some of them, and cropped arms wouldn’t work for that.
The same goes for the photo orientation, and how much of the background you want in the frame.
#6 — Plan your outfits and shop for the right clothes if needed
Alright, this is the step that took the most time for me.
As a person who works from home, who likes to work in cozy sweaters and comfy jeans -some would say too much 😎-, it was a challenge to get out of my comfort zone and find a few pieces that were still me but also more impactful and eye-catching.
So think about what reflects your identity yet looks good on camera and will resonate with your audience the most.
And also, it’s not just about how the outfits look or a formal “appearances” thing… wearing the right clothes will benefit your confidence and help you feel 100x more powerful.
If you know you’re going to use these photos for many different purposes, from your website to Instagram, as speaker headshots, for ads, and who knows what else, then I’d recommend having at least 4 different looks.
In my case, we went with these styles:
- A more relaxed/homey outfit
- One that’s more authoritative
- One that you’d wear to a meeting with a client
- One that says “let’s get to work 💪”
…Whatever this all means in your particular industry.
Then have a few spare shirts and trousers that you can grab in case something doesn’t work and -again- plan for that, because you want to come to that day as prepared as possible.
Now, what about colors?
You want to think about your colors too. In the end, these photos will be used on your website and social media channels, so if you care about cohesiveness and having a strong visual identity, then it’s best to pick garments that go well with your brand’s colors.
It doesn’t have to be the exact same shades. And also, if your brand only uses green and yellow, it doesn’t mean you have to wear green and yellow (oh hi there, Subway’s CEO! 👋)… it just means that you may skip wearing pink or that it’ll be best if your outfits match those green and yellow, as well as the elements in the background.
Hope I’m making sense 🙂
#7 — Delegate what you don’t know or can’t do
As small business owners, we are used to doing everything ourselves… I mean, if we could, we’d take our own pictures, am I right? 🙋🏻♀️
Here’s the thing, tho… you’re probably not going to do this photo shoot again anytime soon. And you want the photos to be as good as possible, don’t you?
So, if there’s anything that you’re not an expert at and you can afford it, hire someone else to do it. Or bring in a friend who can help you tackle that.
Maybe it’s makeup, perhaps styling your hair, getting a haircut, or shopping for outfits… it’s okay to invest in your pictures and look your best that day. If you need to, find someone to take care of the things that you find the most challenging.
#8 — Plan your shots
Some people won’t even think about this part. They hope they’ll stand in front of the camera looking cute, smile, and that’s it.
But we’re not some people, are we?
While that may work for the lucky-always-knowing-how-to-pose, that doesn’t work for us muggles.
So you want to give your shots some thought.
Think about your brand’s vibe and what you want to communicate:
Is it joy? Then you’ll probably be smiling or laughing.
Is it trust? Then have a few power poses prepared.

Also think a bit about your copy needs.
If your copy plays with the idea of juggling multiple things at once, maybe preparing some juggling balls as props could be cool.
If you’ll run an ad that says “The #1 secret for….”, maybe a surprising face could work. Or a shushing gesture.
Also, plan for a few photos of you simply pointing in different directions. They usually turn out great for adding copy next to you on top of the photo.
You’ll probably want to have some photos with a clean background that you can crop and use in any context. And you’ll want part of them with an environment in the background.
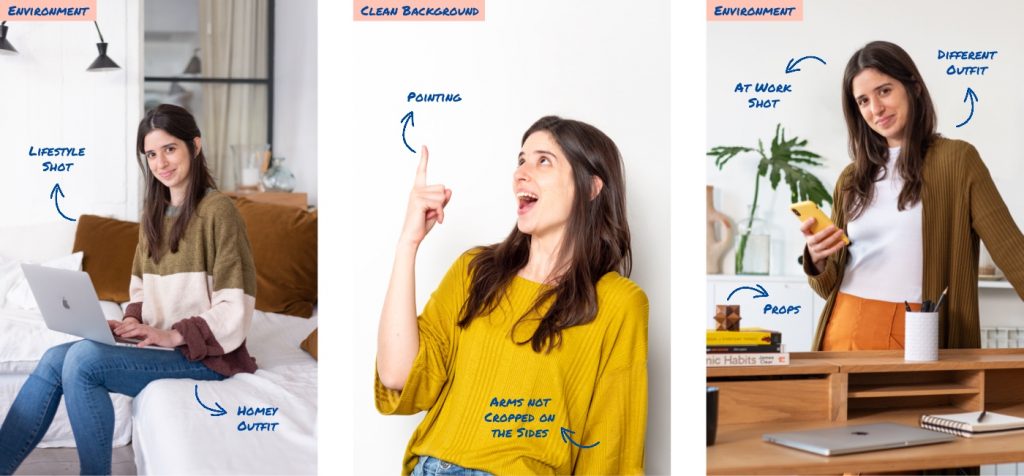
Finally, plan for some shots of you working. On your desk, on the couch, on the kitchen counter, with a cup of coffee, without it, etc.
Then also plan some of your super inspirational lifestyle photos, whether that is reading, drinking tea, walking around, dancing, flying kites, you name it. Who am I to judge?
In the end, it’ll probably be a mix of everything…
working
+
lifestyle
+
clean background
+
environment
+
laughing
+
power pose
…but the important thing is you don’t want to miss any of these shots if you know you’re gonna need them.
#9 — Consider your props
So besides your gorgeous face, the stunning clothes and your perfect nooks… you most likely are going to need some props.
I’m talking about your laptop, your phone, headphones, any other devices that you regularly use when working.
If you’re going to stage a working space, you could also use a desk lamp, a notebook. Then some decorative stuff like a plant, some books, maybe a blanket.
Don’t forget your mug. I know, it sounds like a cliche, but you will probably like to have some pictures with a cup in your hands or over your desk.
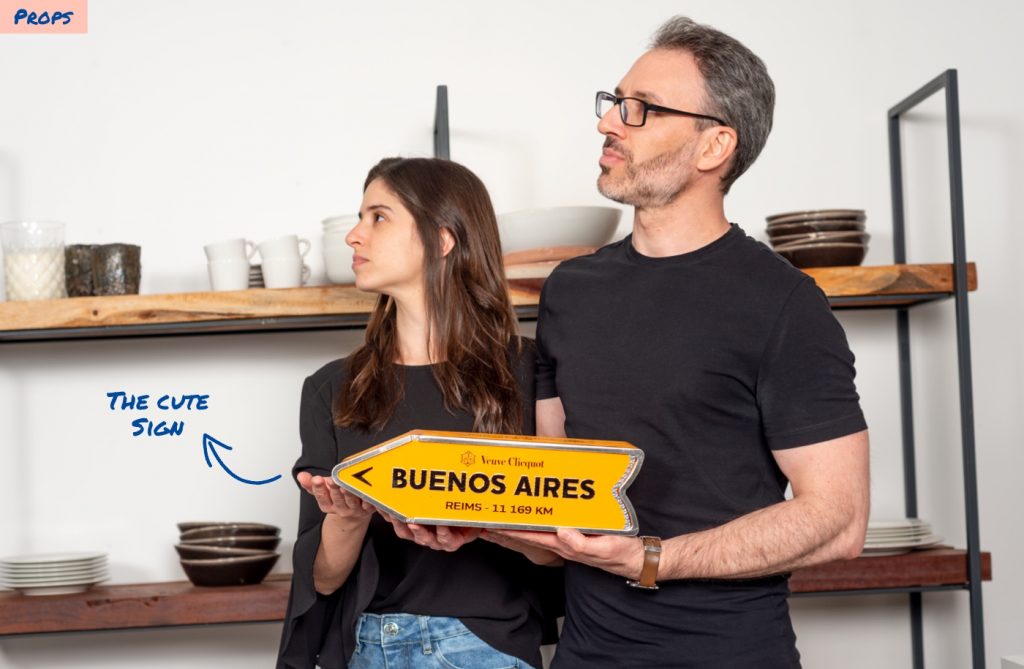
Finally, spend some time thinking about other special props for ideas you may come up with. For example, we knew we wanted a few pictures of us just goofing around with a more casual vibe. So we grabbed this cute sign and posed with it.
#10 — Keep your skin hydrated
We’re getting to the final tips of this post. These last ones are super practical yet often overlooked.
A few years ago I read on a photographer’s page that she recommended drinking lots of water on the days prior to a photoshoot to have your skin more hydrated and look better on camera.
I’m not sure that actually works. I googled and found that there’s a bit of a controversy around the actual effect of drinking water on the appearance of the skin compared to other ways of hydrating your skin.
Nevertheless, whether it’s drinking more water or regularly applying moisturizing products, I think it’s important to take care of your skin hydration before the shooting.
Especially if you’re going to keep your makeup minimal or not use makeup at all, having your skin hydrated does make a difference on camera.
Something to keep in mind!
#11 — Make a checklist
It’s time for a good ol’ checklist.
If you have a husband who is also a stage manager (hi! 😅) then you can skip this section altogether. You’re lucky and most likely multiple checklists were created as soon as you started talking about this.
No stage manager in da house? Then pay attention. Checklists are your best friend for everything you want to get done.
(I’d definitely wear a t-shirt that reads “checklists for everything”)
After all that we went through, we don’t want you to forget anything on the big day. So sit a few minutes the day before and write a comprehensive checklist of everything you’ll need to have ready with you.
Include your outfits, makeup, props, and don’t forget these items:
- Your phone charger
- Your laptop (and clean it the day before!) + charger
- Toothbrush (you don’t want any spooky things in your teeth! 🦷 )
- A brush/comb
- Lip balm (you’ll want to keep your lips moisturized throughout the session)
- Something sweet (in case a sugar rush is needed!)
Remember the mental list of all the different shoots you need? That’s a good opportunity for a checklist too right there. Your focus during the session will surely be somewhere else, but you can give that list to a friend to make sure you don’t forget any important photos.
#12 — Sleep well the night before
Don’t underestimate the effects of a good night’s sleep.
It’s going to be a long day. Make sure you rest well the night before so you can be at your best both mentally and physically.
Also, your eyes look much fresher after a good night’s sleep. And your eyes are an important part of your pictures!

#13 — Start early
We wanted our photos to have as much natural light as possible, and we also knew the session would take several hours because we had lots of different scenes to stage and capture.
So my advice is to start as earlier as possible and not rush it. You want to feel comfortable and relaxed, and none of that is possible if you’re running out of time.
Talk with your photographer and see what works best for both of you. But try not to make it a 2 hours quick sesh at 3 pm unless you only need 5 good photos. If you’re aiming for tons of pictures, with outfit changes, and multiple scenes, you’ll need time to dress/freshen up and the photographer will need time to adjust the lights on every scene change.
And you all are also going to need to take a break somewhere in the middle.
Summing up: start early and book the whole day if possible.
#14 — Take a lunch break
A full-day session can get exhausting sooner than you’d expect. If you planned for a long photo shoot, then plan a lunch break and bring in food for everyone.
When we did our session we were five people: us two, the photographer, his assistant, and a friend who came to help us. The lunch break was great to have some relaxing fun with everyone there and renew our much-needed energy.
Don’t skip lunch unless you want everyone to get cranky 🫣
#15 — Bring someone whose judgment you trust
I left this tip for last, but I can’t stress enough how important this one is.
On the day of the photo shoot your head will be 100% focused on putting your best “I-rock” face for the camera. Even if you want to, you won’t have the mental space to worry about any other things. And that’s fine!
So you ideally want to have a fresh set of eyes looking after the rest of the stuff.
A friend, a sibling, a partner, someone that you know will pay attention to the little things like:
- Making sure you don’t forget a specific photo you wanted to take
- There aren’t any embarrassing photos hanging behind you (laugh all you want, this is ought to happen!)
- You don’t have a poppy seed between your teeth from the bagel you ate that morning
- Bringing lunch for everybody
- Playing the best uplifting music in the background
That’s it for me. I’m not sure I have any more tips, although I’m also not sure my editor would allow me to keep adding to this list so, in the name of good post editing, the 15 you read already will have to do.
So…
Ready for your kick-ass photoshoot?
Have any other tips you’d add to the list?
Share ’em in the comments! 🙌